Recent Blog Posts
-
How to repair scuffs & scratches on leather
-
How to clean a leather sofa
-
How to clean aniline leather
-
How to restore leather
-
How to change the color of a leather sofa
-
How to repair a tear in a leather sofa
-
How to repair cat scratches on leather
-
How to repair a cut in leather
-
How to soften leather
-
How to repair a burn in leather
-
How to restore a leather car seat
-
How to remove stains from leather
-
How to change the color of leather car seats
-
How to restore a convertible roof
-
How to restore a shoes shine
-
How to clean classic car leather seats
-
How to get a spare piece of leather
-
How to fix a hole in a leather car seat
-
How to repair a chip in wood
-
How to repair deep scratches in wood
-
Oiling decking - How to apply decking oil
-
How to oil A chopping board
-
How to prevent staining, color loss and general wear
-
How to restore and protect your cutting board
-
How to clean and restore garden furniture
-
How to clean leather

How to repair a tear in a leather sofa
If you're looking for to make a leather sofa repair, this guide will show you how to fix a tear in leather, but the same technique can also be used to make similar types of repairs in leather sofas. The same procedure applies to tears in all type of leather: furniture, car interior, clothes and all other leathers.
If you want to buy leather repair products for sofas, follow this link - Leather Sofa Repair.
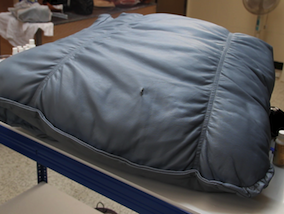
This photo shows a tear in a panel from a leather sofa. To fix the tear you will need the Complete Leather Repair Kit.
PRODUCTS REQUIRED
Leather Repair Kit- - Contains all the product needed to repair the tear and restore any colour.
STEP BY STEP GUIDE: REPAIRING A TEAR ON A LEATHER SOFA
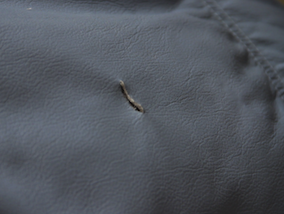
STEP 1. ASSESS DAMAGE & CHOOSE SUITABLE PRODUCT
The tear we are fixing is no larger than a tennis ball, so we have chosen the Complete Leather Repair Kit. If the damage is larger than this, then you'll need to buy the Sub-Patch, Heavy Filler and Leather Glue individually.
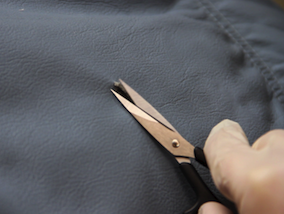
STEP 2. TRIM/PREP THE AREA
The next step is to take a scalpel or a pair of sharp scissors and trim the worn edges off the tear, making for a cleaner edge and smarter repair.
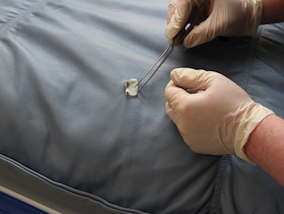
STEP 3. INSERT SUB-PATCH BEHIND THE LEATHER
Using tweezers and the sub-patch supplied in the Complete Leather Repair Kit, insert the patch behind the tear.
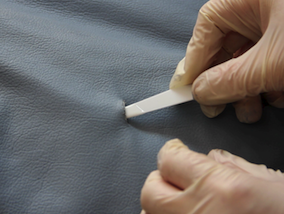
STEP 4. APPLY GLUE TO SECURE SUB-PATCH
Once the cloth is behind the leather, use a spatula to apply the Leather Glue onto the underside of the leather. Basically - put the glue inbetween the cloth and the leather.
Press the leather down onto the cloth once the glue has been applied to all the edges and leave it to dry.
This technique re-creates the backing of the leather making for a very strong repair.
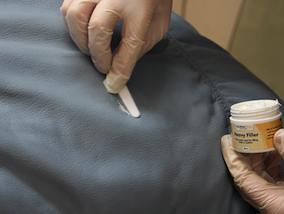
STEP 5. APPLY HEAVY FILLER TO THE TEAR
The next step is to apply the Heavy Filler into the tear. This will fill the gap in the leather making it level with the rest of the leather.
The filler is applied in several thin layers and a grain pattern can be embossed into the final layer to further blend the tear in with the rest of the leather.
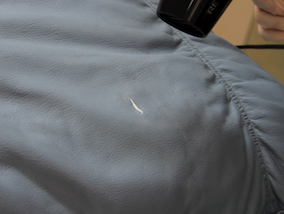
STEP 5. BUILD UP HEAVY FILLER, DRYING EACH LAYER
Apply one thin layer to start with and then dry it off with a hair drier for a few minutes. Repeat this process until the tear is about 3/4's full.
Then apply one last layer to the tear and smooth it off with the palette knife making it level with the leather.
For a perfect repair you can use Grain Repair to manually recreate the grain before applying colour.
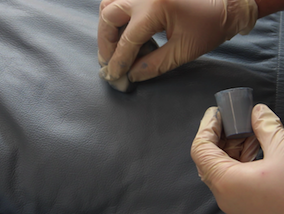
STEP 7. APPLY COLORANT
When the filler is dry, the next stage is to apply the color. To do this, simply take the Colorant and apply a small amount to a sponge. Use this to apply the Colorant to the repair, blending it with the surrounding leather.
Apply the Colorant in multiple thin coats, allowing time for each to dry before moving on to the next. Apply as many coats as it takes to conceal the repair.
The Colorant provided in the kit is our Self Seal Colorant, which will not only restore the color to the leather, but it is self sealing and so protects the leather from wear & tear.