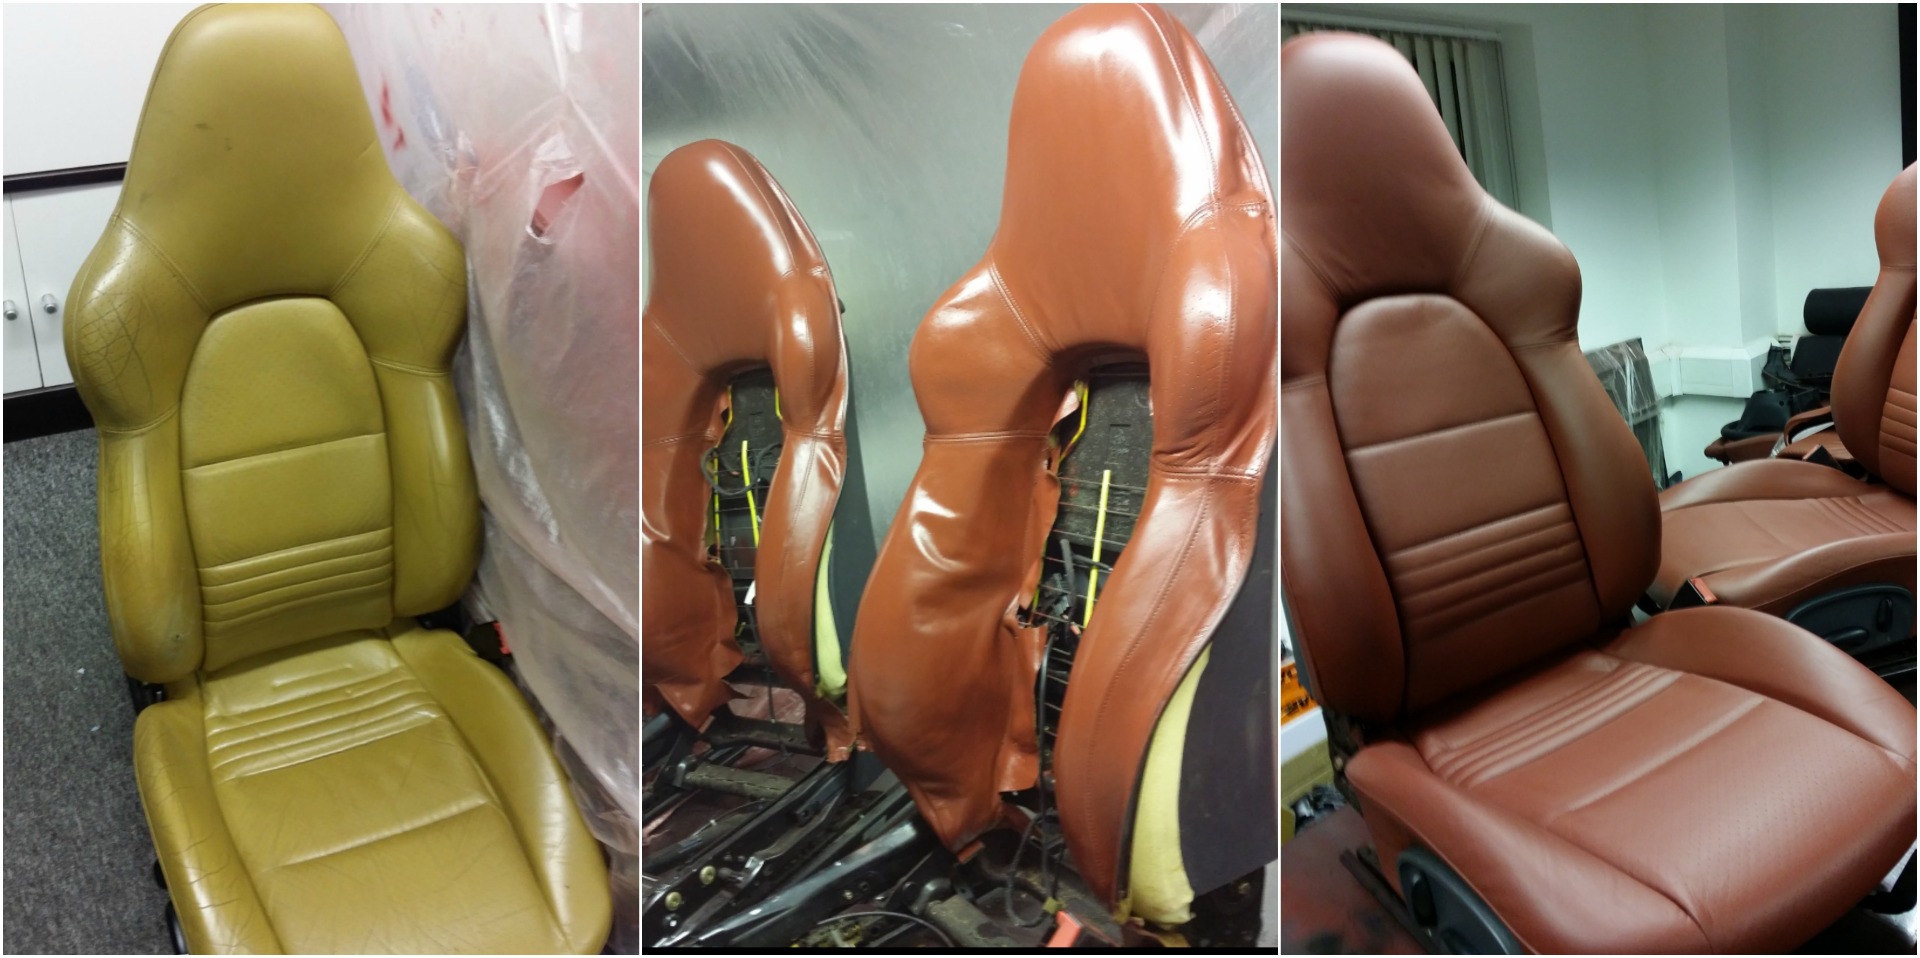
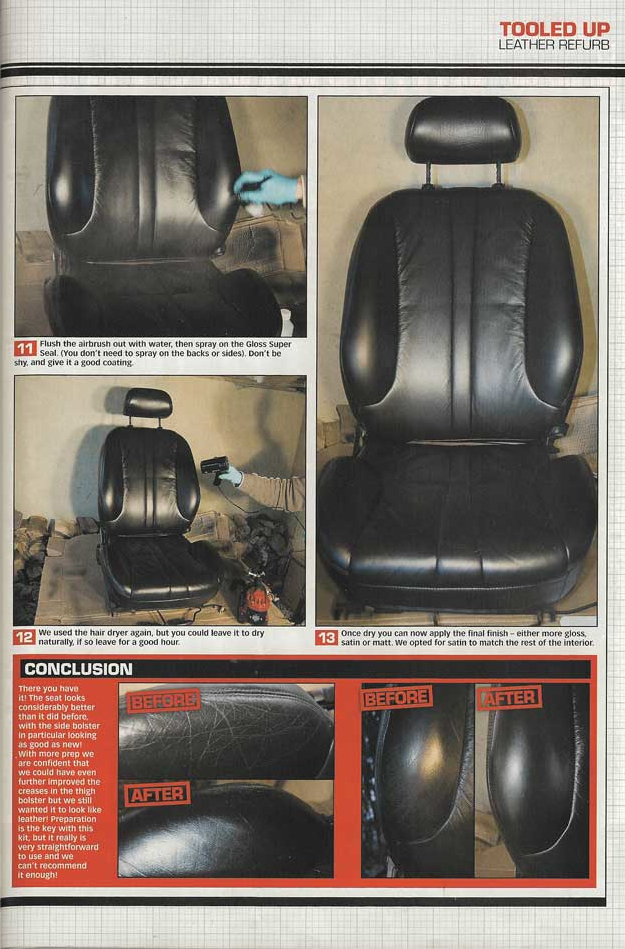
Leather Colorant Kit
Our Leather Colorant Kit is used and recommended by professional upholsterers in both the furniture and automotive trade. Not only that, but the colorants we use are the same kind as the ones used in the manufacturing of top quality leather hides.
LEATHER COLORANT KIT: OUR PROFESSIONAL LEATHER COLORING PRODUCT ONLINE
At Furniture Clinic, we don’t believe in temporary fixes. Many of our customers come to us looking for a product that doesn’t need to be purchased over and over again for minimal results. When we first emerged in the leather care industry, we noticed that many of the leather coloring products online were a temporary fix: they solved the issue at first glance, or on a surface level, but time and time again the buyer encountered the same problem.
Our Leather Colorant Kit is designed to provide a more long-lasting, cost-effective solution to leather coloring. Created and thoroughly-tested by industry professionals, and highly-rated by our customers, the Leather Colorant Kit is the industry leading leather coloring product - designed by our team at Furniture Clinic.
MORE THAN A LEATHER COLORING DYE: IT’S A LEATHER COLORING PROCESS
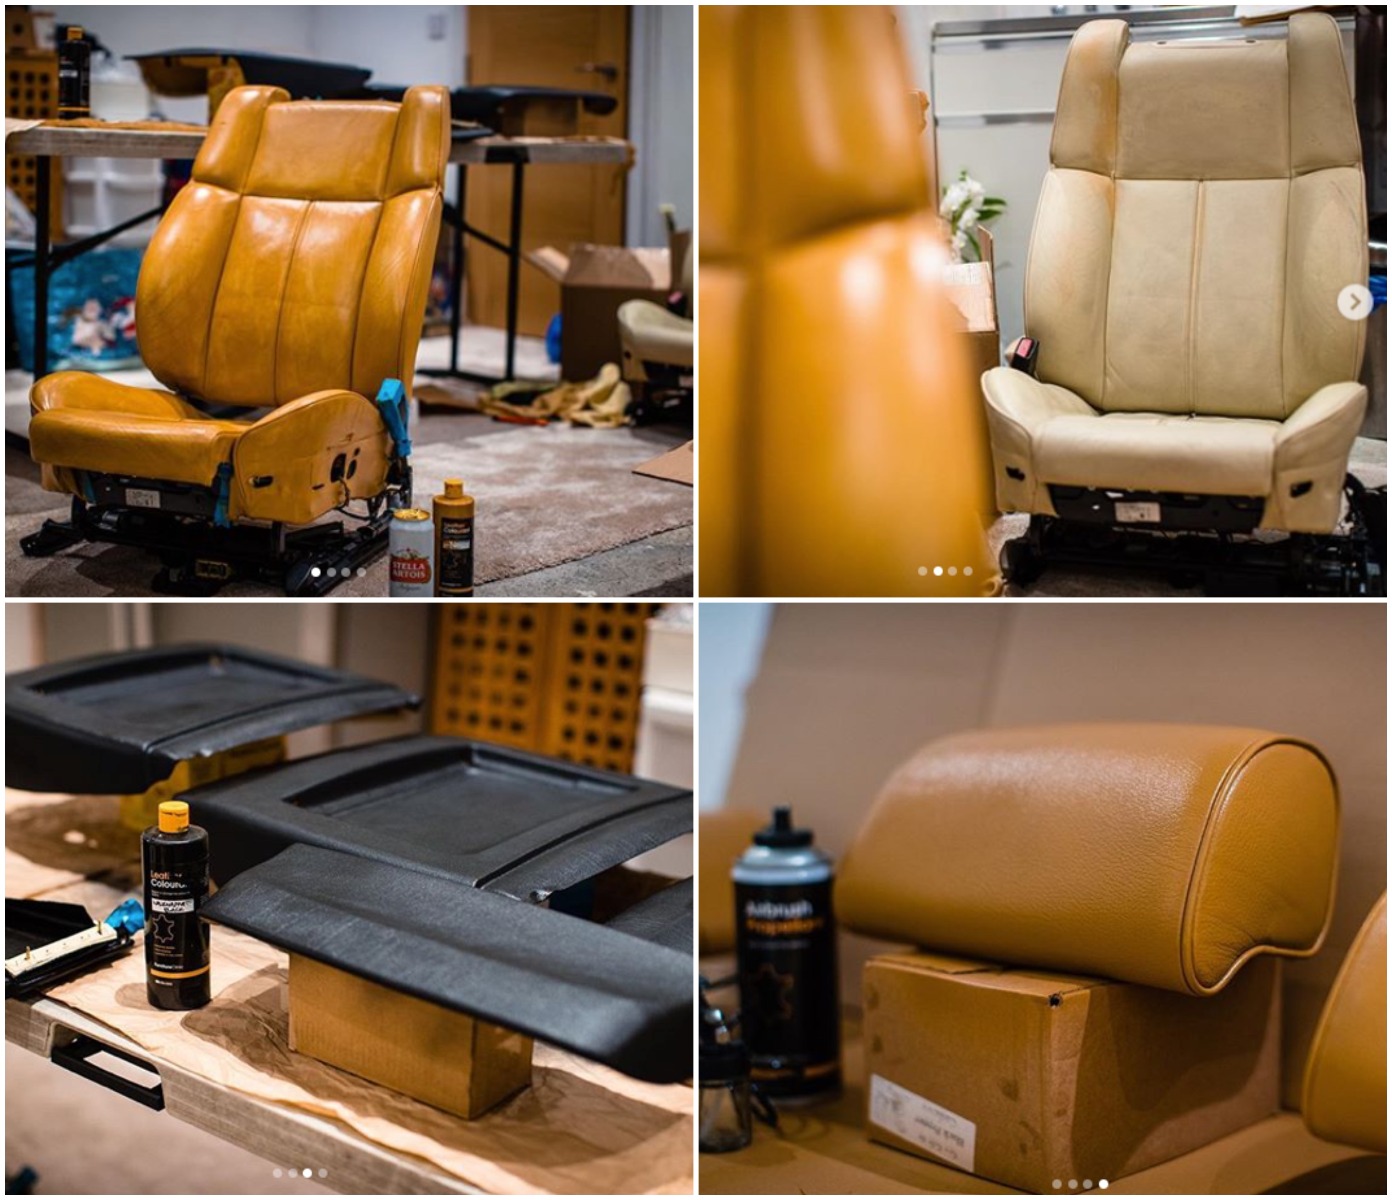
Our Leather Colorant Kit is effective because it integrates a leather coloring process that, once applied, will restore your used leather to industry standards. Here’s an overview of the quick and easy process involved:
-
Remove the manufactured finish from your leather, allowing the colorant to adhere to and penetrate the leather
-
Spray on a colored coating for uniformity, giving the leather a nice and natural finish
-
Seal the coating with a professional leather finish.
In three easy steps, the Leather Colorant Kit restores your leather to a look and feel that will make you – and others – think you recently purchased the leather product to which it was applied.
A LEATHER COLORING PRODUCT THAT’S SAFE FOR USE ON ALL LEATHER ITEMS AND STYLES
Speaking of leather products, the Leather Colorant Kit is suitable for furniture, car seats, clothes, shoes, handbags, equestrian leather, and more!
This product is most commonly used, and recommended, by professional upholsterers in the furniture and automotive trade, as its colorants are the same kind that are used in the manufacturing industry.
Featuring a large range of colors, many of which have been already matched with popular car manufacturers, our Leather Colorant Kit is customized and made-to-order each and every single time it’s purchased.
To further customize this product and service, we recommend that you send a sample of the leather that you will be recoloring. You can find our guide on getting a sample here. As soon as you have your sample ready to go, simply fill out this form, attach it to your sample, and send it to us! This allows us to find the color that perfectly matches your leather - saving you time and uncertainty after placing your order.
ORDER YOUR LEATHER COLORANT KIT ONLINE TODAY, AND DISCOVER YOUR LONG-LASTING SOLUTION
Let’s say no to the temporary fixes that are commonly sold in the leather industry, and start saying yes to products that last longer, work more effectively, and provide a leather solution that will never flake, fade, or peel off.
Order your Leather Colorant Kit online today, and treat your leather to the industry-leading level of care that it deserves.
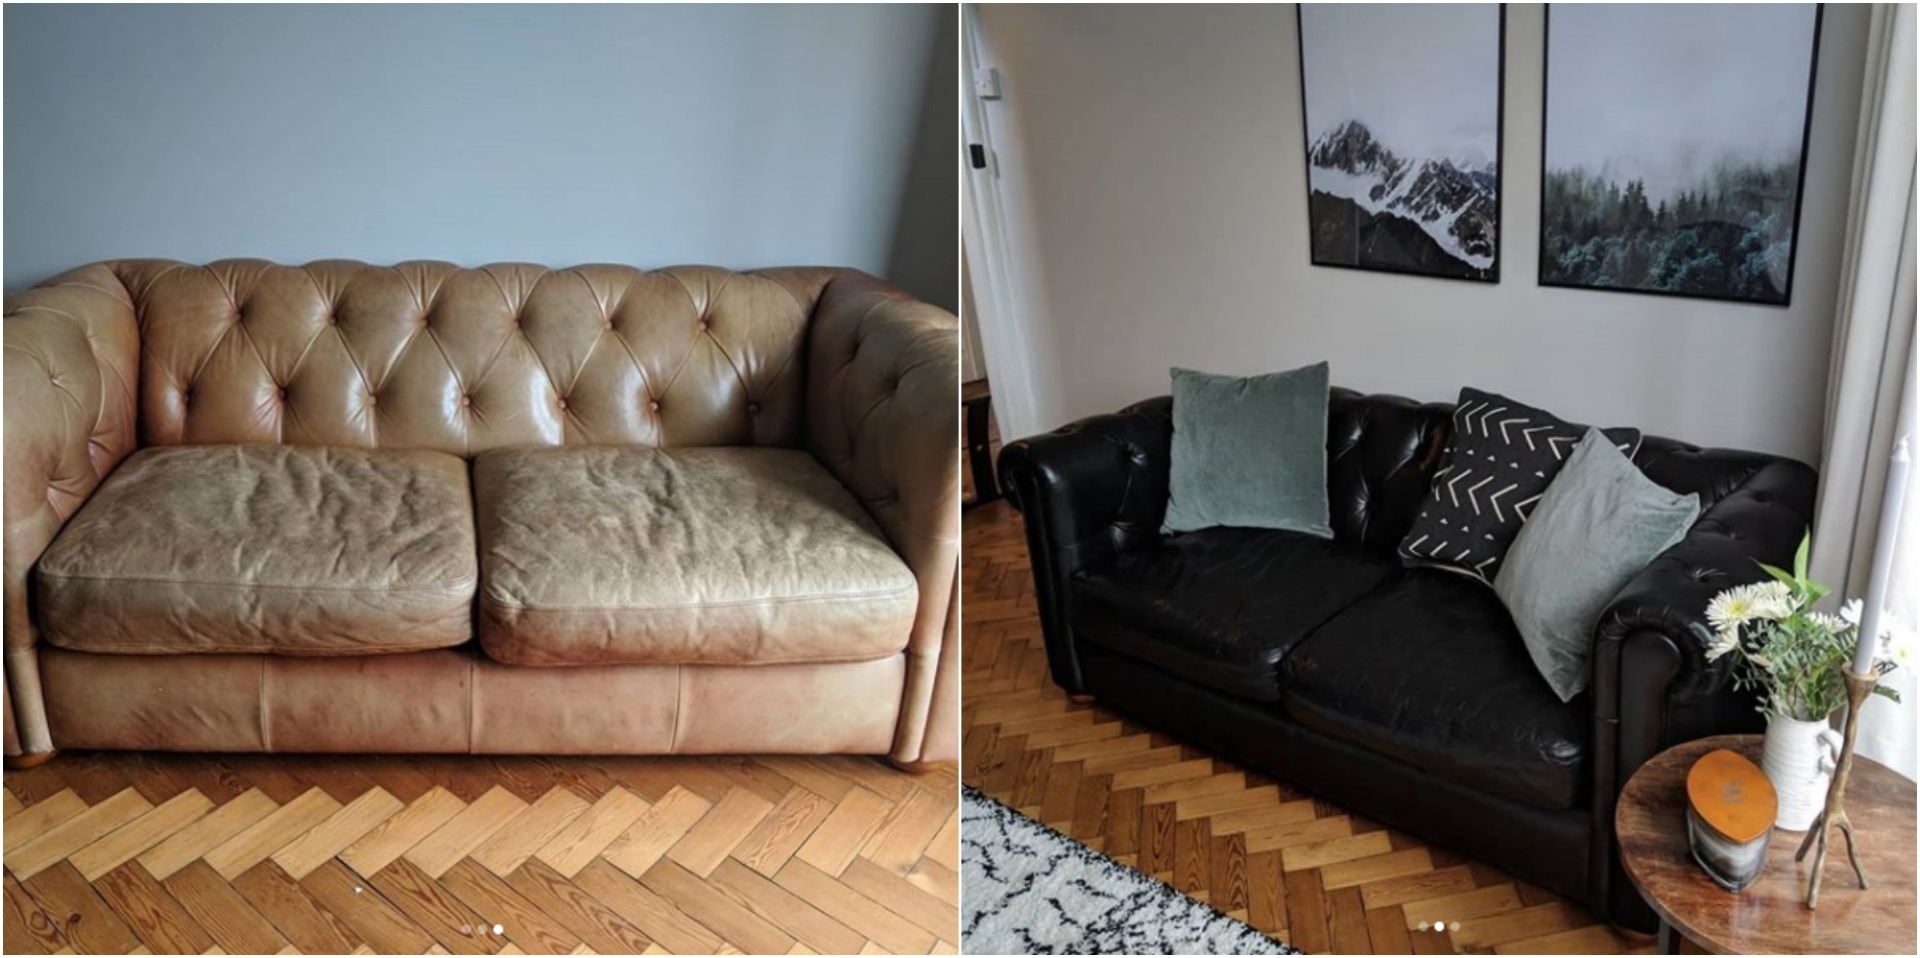
Leather Colorant Kit is Suitable For
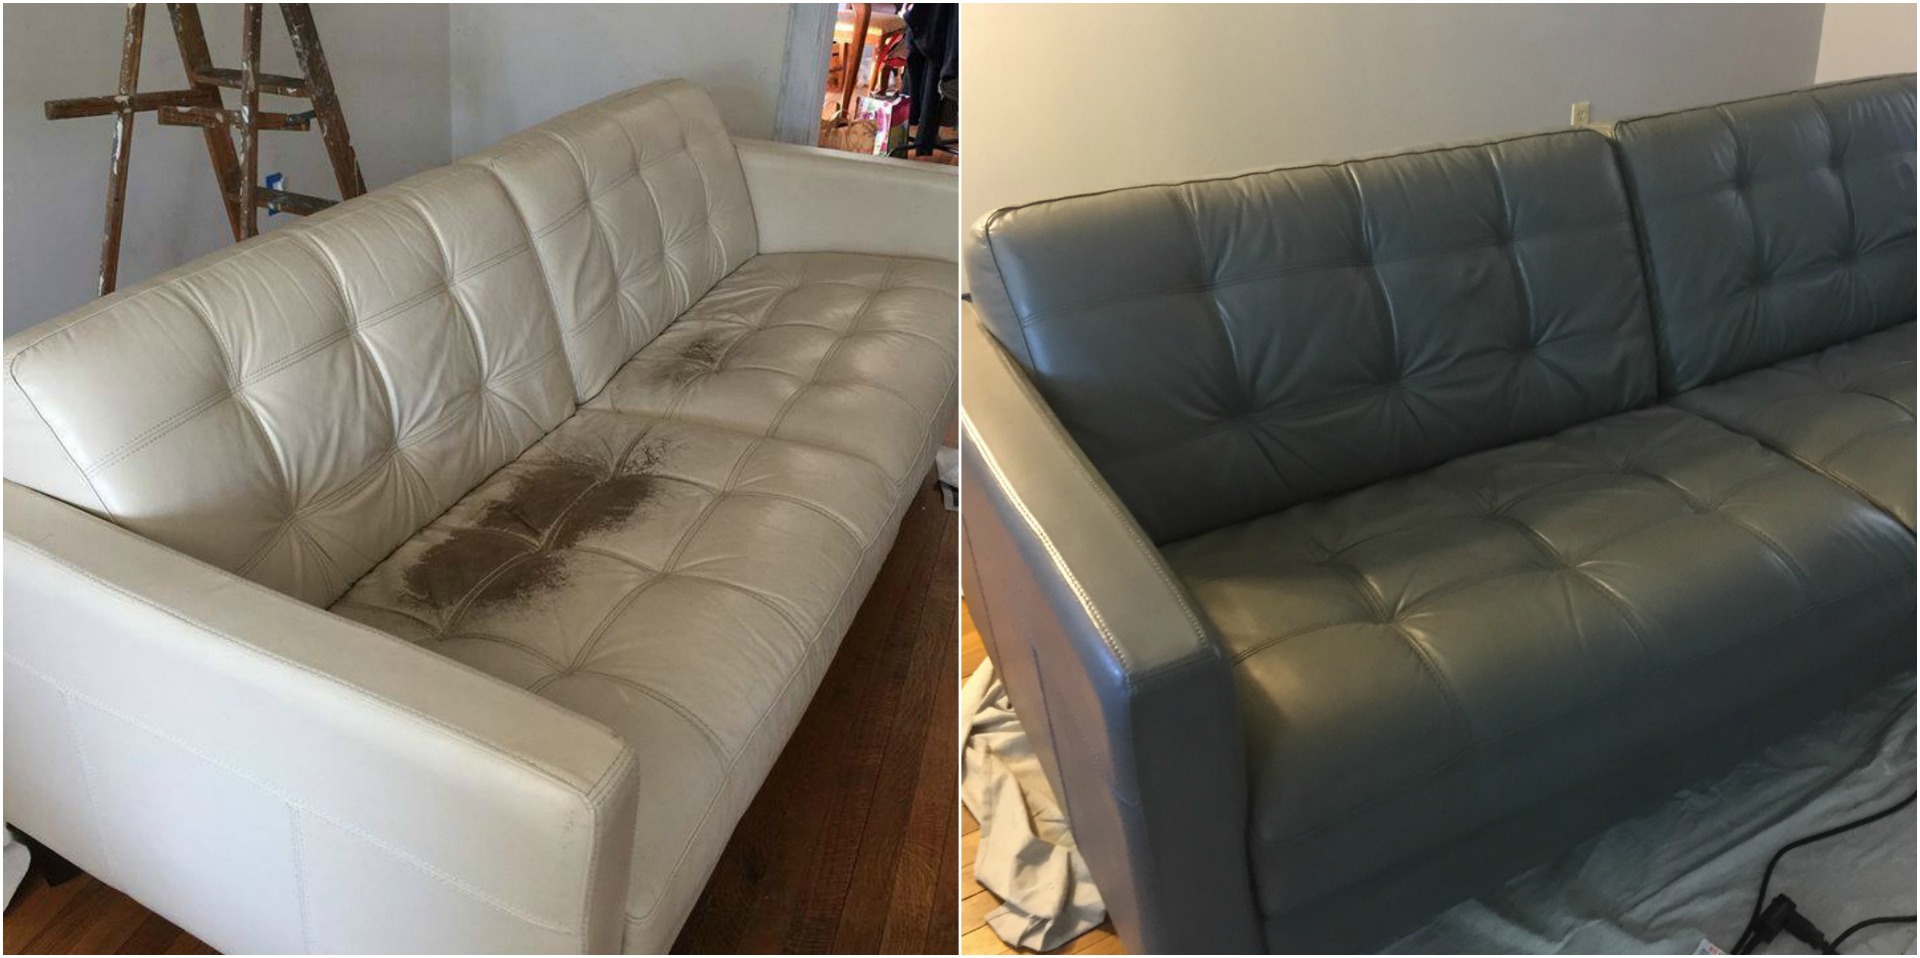
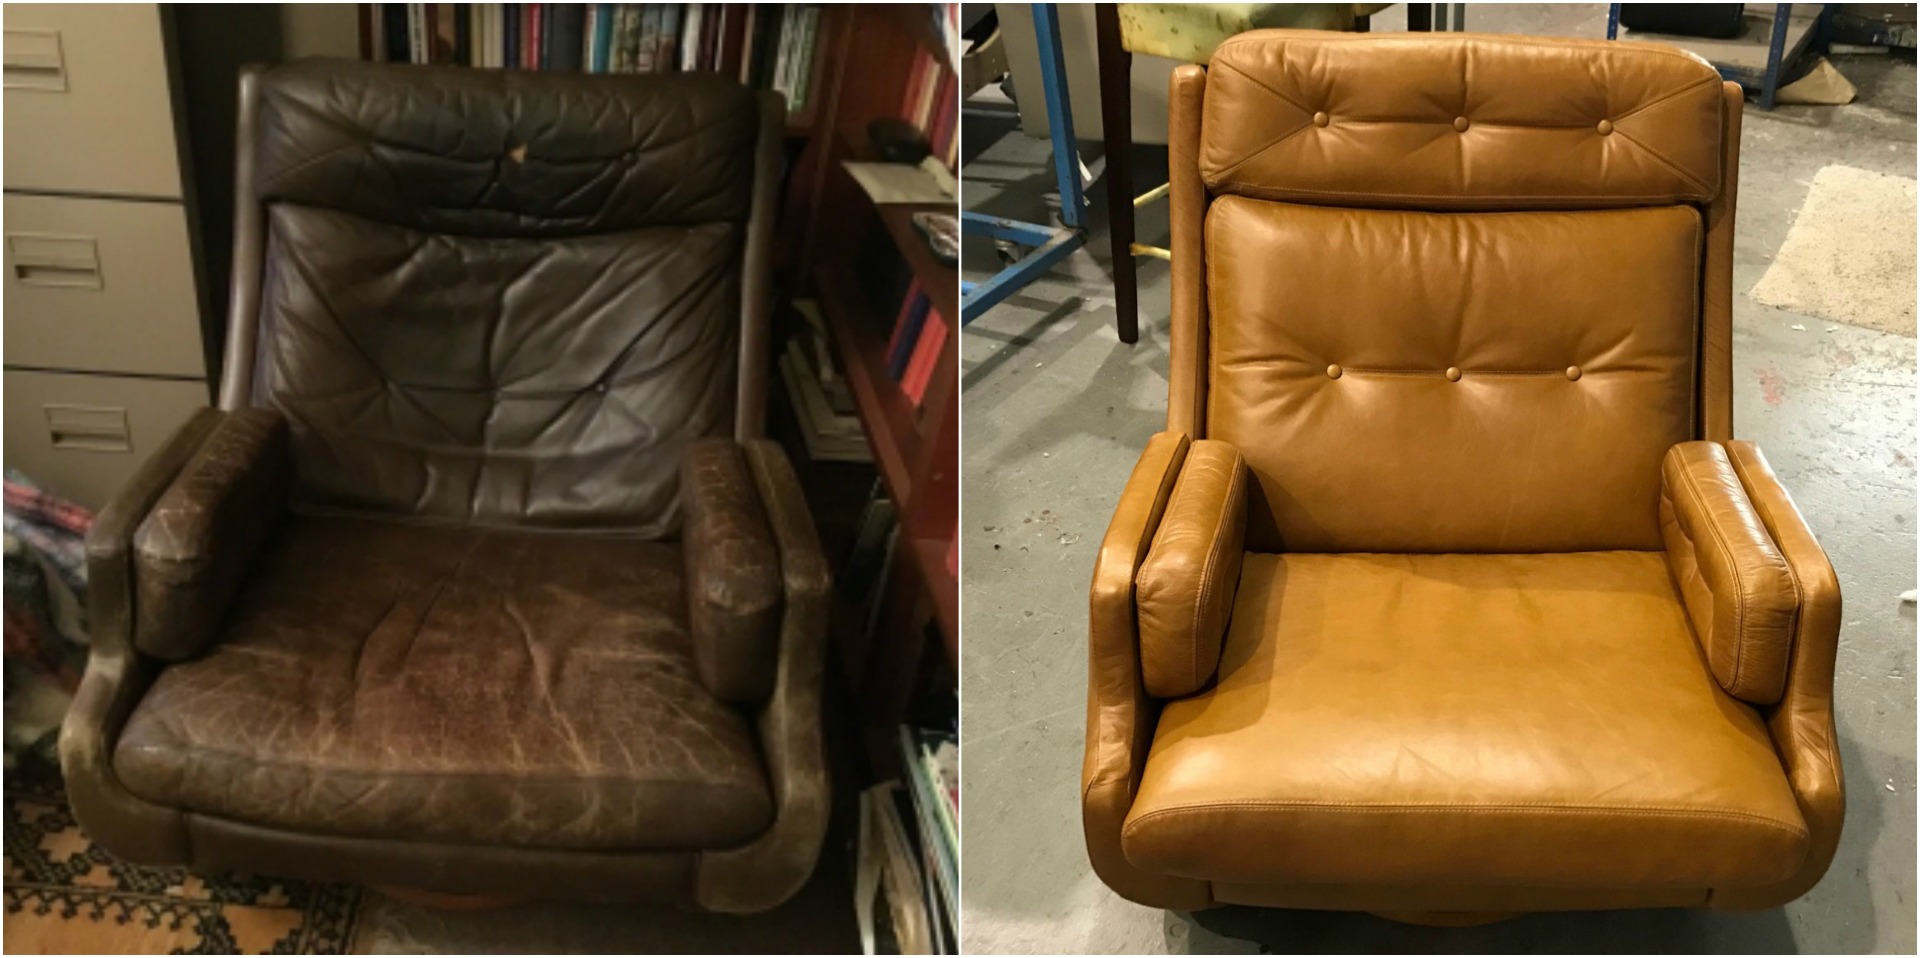
Our Leather Colorant Kit can be used to change or restore the color of furniture, car seats, clothes, shoes, handbags, equestrian leather and any other item made of leather.
![]() Aniline & Semi-Aniline Leather
Aniline & Semi-Aniline Leather ![]() Pigmented Leather
Pigmented Leather![]() Oil and Wax Pull Up Leather
Oil and Wax Pull Up Leather ![]() BiCast Leather
BiCast Leather![]() Two Tone, Mottled & Antique Finished Leather
Two Tone, Mottled & Antique Finished Leather
Leather Colorant Kit Coverage and Shelf Life
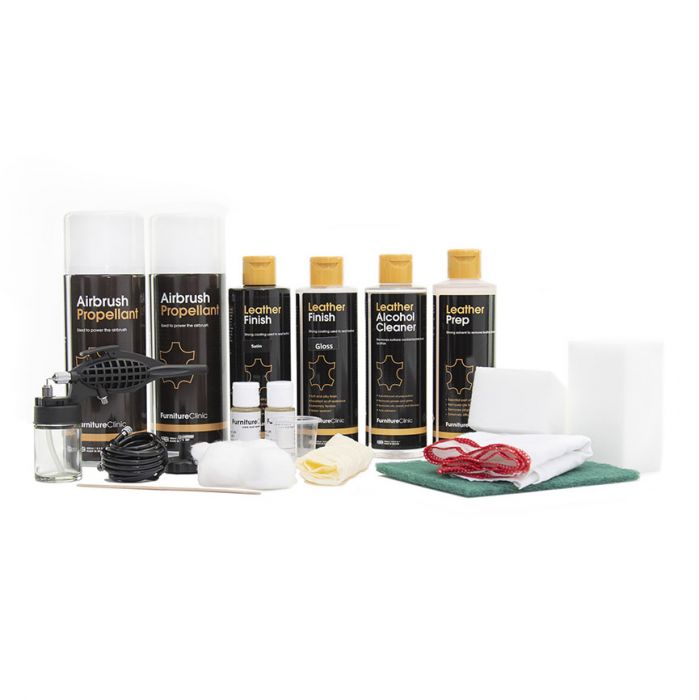
The Leather Colorant Kit is available in two sizes;
Standard Kit - Will restore anything up to the size of a large armchair!
Large Kit - Will restore a full car interior or three piece living room set!
The kit doesn't have a shelf life. However, the longer it sits on the shelf, the more thoroughly the products will need to be shaken before use.
The contents of each sized kit are shown below:
Standard Colorant Kit (For mid-sized areas such as large armchairs or two car seats):
- 250ml Leather Prep Cleaner
- 250ml Alcohol Cleaner
- 500ml Leather Colorant
- 150ml Super Seal + 150ml Leather Finish
- Spray Gun & 2 x Propellant Cans
- Sponges & Accessories
Large Colourant Kit (For very large areas such as a full car interior (5 seats, door cards, dash and all other leather areas) or a three and two seat couch set
- 500ml Leather Prep Cleaner
- 500ml Alcohol Cleaner
- 1500ml Leather Colorant
- 250ml Super Seal + 500ml Leather Finish
- Spray Gun & 4 x Propellant Cans
- Sponges & Accessories
A fine result can be achieved with our kits, remember they are designed for the general public and so have been made as easy as possible to use. For detailed instructions of how to dye leather, please read one of the following guides.
| LEATHER FURNITURE |
LEATHER CAR INTERIORS |
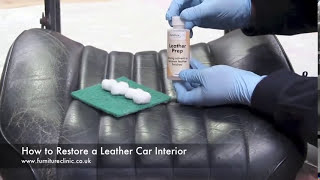 How to Restore a Leather Car Interior 243,939 views
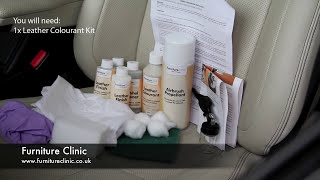 How to Repair a Leather Car Seat 653,637 views
Restore or change the color of your leather funiture, car interior and more!
* Please note: the may need repaired or strengthened before recoloring. Always check with a sales advisor if you are unsure.


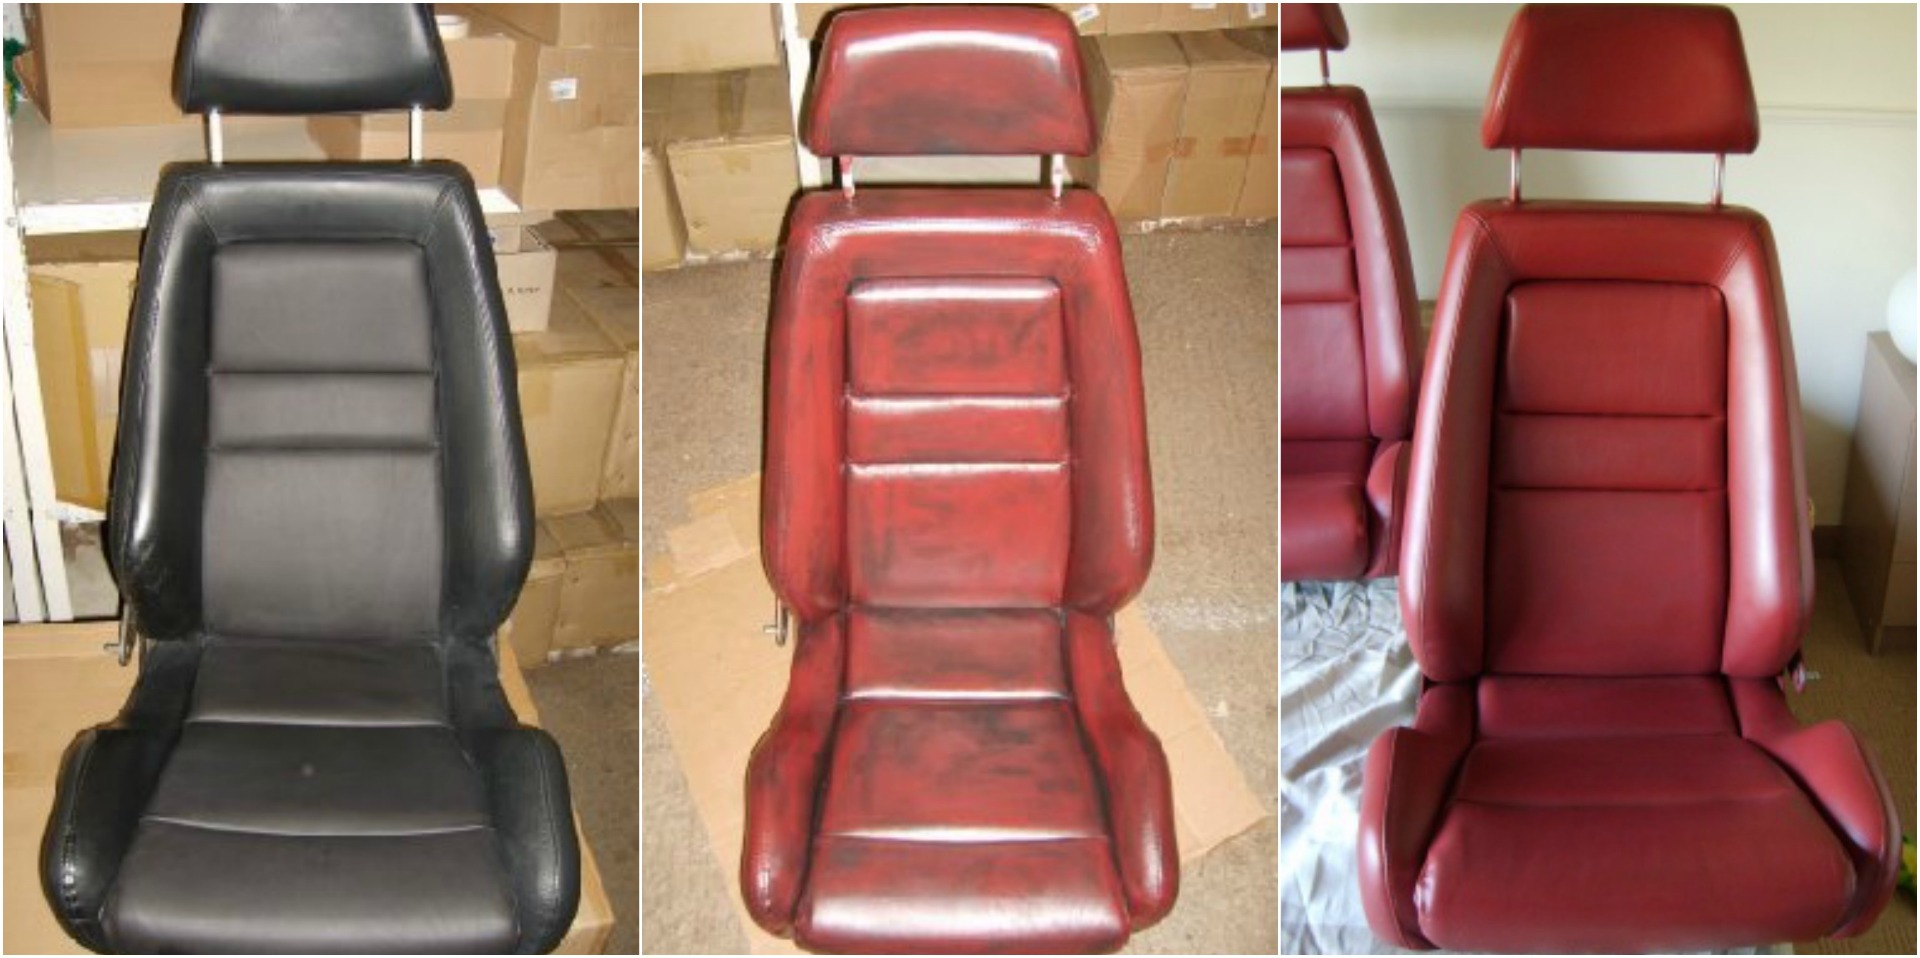
We have 24 popular colors to choose from.
IMPORTANT: The colors shown here are dependent upon screen settings or monitor calibration, they are a guide only. The actual colour may vary.
Mercedes Gazette
A Recommendation Made and Another Endorsement
 Dear Chris,
I would like to recommend The Furniture Clinic (0844 879 3691) as an excellent supplier of leather restoration products.
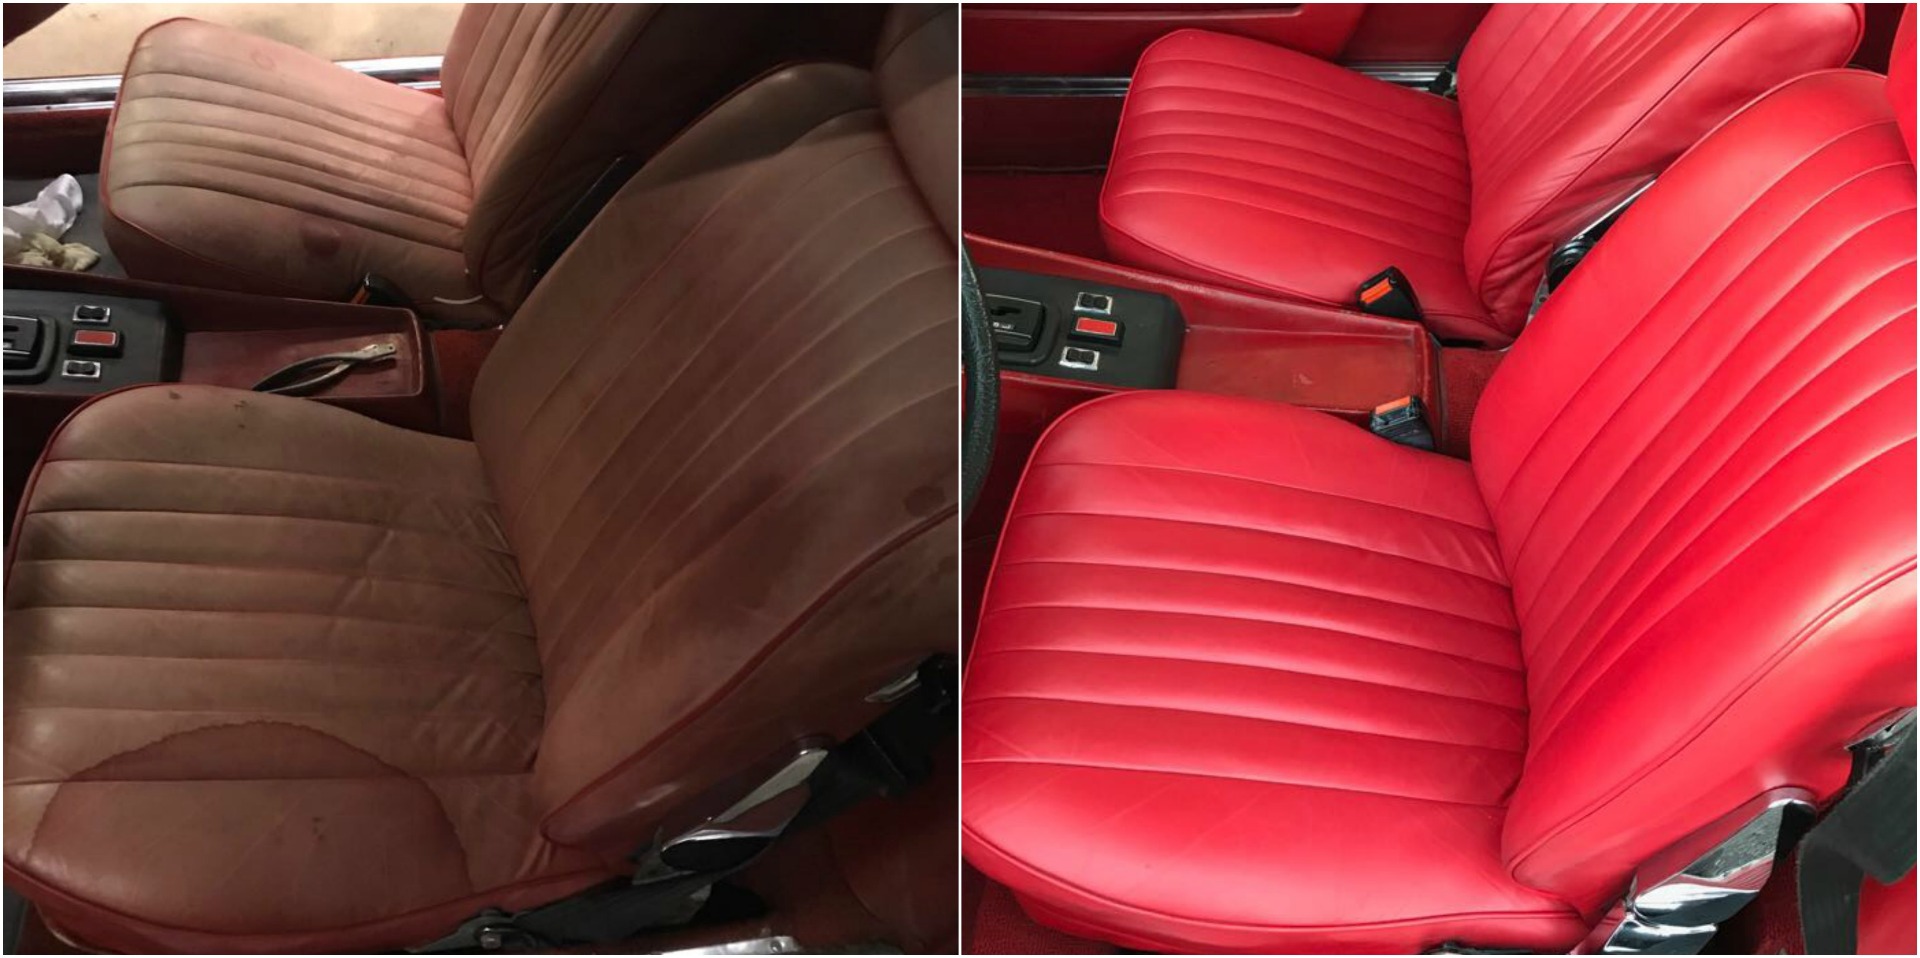
The driver’s seat on my 560SEL had some substantial cracks, which rather spoilt my enjoyment of the car. Having been unable to find a good second-hand replacement, I was pondering having a new panel sewn in; however such a repair would certainly not match the naturally aged appearance of the remainder of the seat.
I thought I would first try a restoration product, and telephoned The Furniture Clinic. They did not have a record of the dark red used on my car, so it was necessary for me to send a sample. Nevertheless, for under £50 I received everything I needed: Leather preparation fluid to remove the old finish, a flexible filler to repair the cracks, dye, clear sealant, an air brush to apply the dye and sealant, and a selection of cloths and pads.
I posted the samples on Monday. On Wednesday I happened to be driving on the A1 near Newcastle and noticed a sign to the industrial estate where they are based. I thought it would have been a bit rude to call in and ask whether my order was ready – but I need not have bothered: When I got home I found the package was already there, having been delivered earlier that day. It would have been impossible to provide a better delivery service.
As for the product itself, the color is a virtually perfect match, and I chose to slightly under-fill the cracks, so the repaired panel would retain an imperfect and somewhat naturally aged appearance to match the rest of the seat. It would, of course, have been possible to do a perfect job.
Sending a sample of the leather was only necessary because I was not able to take my car to their premises. They welcome customers and tell me they have people regularly visiting to buy their products, not just for cars but for furniture as well. The people I spoke to on the telephone were helpful and friendly. This is a refreshingly different attitude from one of the other suppliers (Gliptone) who I have heard are rather abrupt and will not accept visitors.
So for £50 and a couple of hours of my time I have achieved a most satisfactory repair, which is, I am sure, far cheaper than what a traditional upholsterer would have charged for such a job.
I would also like to endorse the recommendation of Millennium Mercedes in Bedford (01234 218424) which was made by Dr Robert Oakley in the May issue of the Gazette.
Yours sincerely,
Kim Stopher, Northill
Jaguar World
Feature
 Jaguar World used our Colorant Kit to restore an interior with amazing results...
Diamler & Lanchester Owners Club
Feature
Save That Old Leather


KEVIN BENNETT
This issue contains an article from Clayton Spear regarding the excellent talk given at the DLOC Spring Conference by our guest speaker Aline Angus, by coincidence I had just effected some badly needed repairs to the leather seats in a Barker Special Sports. I am a great believer in con-servation and would rather preserve than replace any item, but as Aline mentioned in her write up there comes a time when the product is no longer fit for purpose and will require replacement. I thought it had reached this point with the seats in this car but decided that I would have one last attempt at repair, the method described by Aline was similar to the one I adopted.
I carried out some ‘on line’ research and settled on a repair method described by ‘The Furniture Clinic’ (www.furnitureclinic.co.uk.). Their website was very informative, and even better, a follow up phone call (0191 482 6112) produced more helpful advice. I purchased a leather repair kit from them and a large full coloring kit, I wanted to restore the color of my seats to a deep maroon rather than the existing blotchy brown and red, which had been brought about by them being previously re-colored. The upholstery had also been the subject of many mostly unsuccessful repairs, some carried out by me.
The products were ordered by telephone and arrived the next day, I always appreciate prompt despatch, even if I do not wish to tackle the job straight away, it is nice to be able to study the instructions and examine the product before rushing into the job.
The method of operation is described in an excellent instruction sheet with a helpline number clearly listed, I was very glad of this as I had a question regarding a large tear which I was able to discuss in detail. (I will come back to this later).
One feature which particularly appealed to me about this particular method is that the seat is not stripped down, the repairs are made with the seat covers on the frames from the surface of the leather, this is a huge bonus to anyone with only rudimentary trimming skills.
The first task is to clean the leather, this alone makes a huge difference, the repair area is then lightly abraded with a scourer dampened with ‘leather prep’ solution. The kit comes with everything you need to effect repairs to rips, holes, cigarette burns or scuffs and is very simple to use, as with any task of this type, the more time you take over it, the better the end result will be. Those of you with more patience than I have, will cer- tainly get better results than mine!
The tear is glued into place using a backing cloth cut to size and the adhesive which is provided, I applied this with an old paint brush which I kept close by in a jar of thinners, after a little practice I found my method worked well. Very deep creases should be gently cut open and treated as a split or tear, this sounds drastic, but the crease will surely split open if it is not repaired, do it now and save yourself having to repeat the process later on! The glue is then allowed to dry (I left mine overnight), the leather may be ‘worked’ together to ensure a good fit or in the case of a split caused by the leather stressing and stretching, left a little ‘open’ to prevent it splitting again, the gap in the repair will be filled with what I thought was the best part of the kit a ‘repair compound’.
The compound, which is creamy in consistency is simply smoothed onto the repair, using a spatula, to fill back to the surface of the surrounding leather, several light coats may be required, and each coat must be left to dry before re-applying. Just as you would with a stone chip on your car’s paint-work, you then flat the compound back with Wet’N’Dry paper (supplied). Rather than using the compound straight from the jar, I transferred a useable amount onto a small dish, thus preventing the prod- uct from drying out in the jar and stopping dirt and grit from contami-nating the unused compound. This part of the job should certainly not be hurried, I took extra time on some of the smaller damaged areas and was delighted with almost invisible repairs, however my seats were very bad and towards the end I started to move the job along (partly because the larger repairs are very much ‘experimental’). Once satisfied with my repairs I got the coloring kit out. If you are just repairing a split or tear and not re-coloring the entire seat you need to simply, ‘dab’ some coloring on to the repair. With practice, invisible repairs are possible.
I found with the method I adopted, the repairs took on the appearance of a crease, in my opinion this effect is perfect for well used leather.
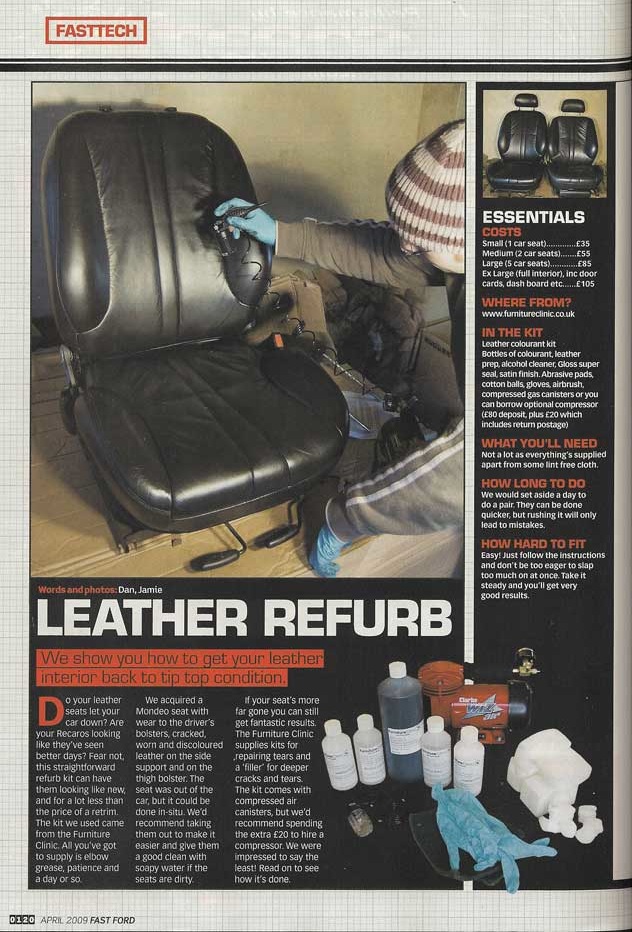
As my seats required full re-coloring, I also purchased a full color kit, (again the product supplied was first class). I have previously used a chemical based pigment which gave good results but was very smelly and came with a hazard warning, in fact it made me feel quite nauseous when I used it. This product is water based, the smell is almost non-existent, and I found it very ‘user friendly’.
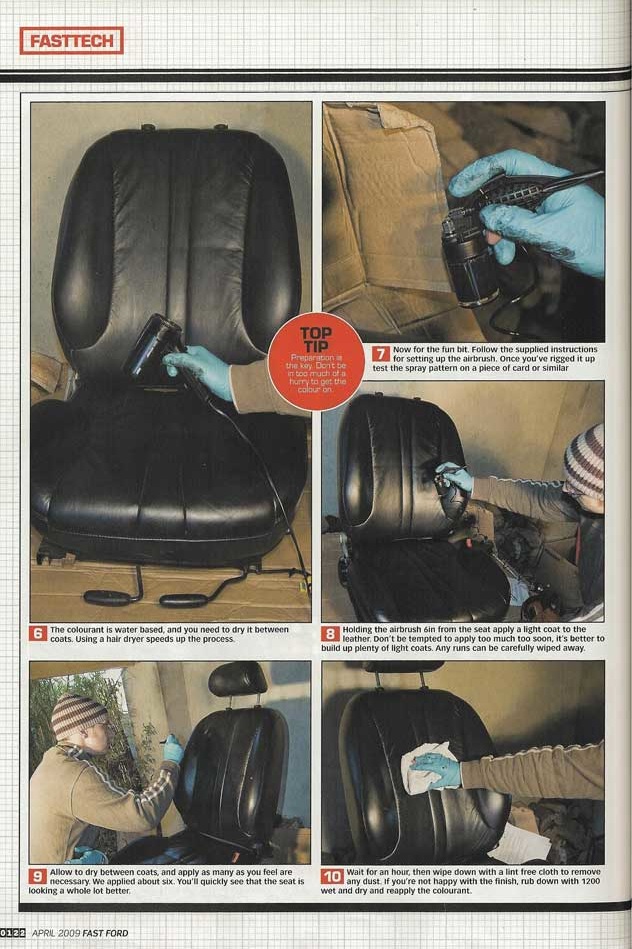
Once the repairs had been made, all of the leather was gently rubbed with a scourer and a cotton bud soaked with the leather prep solution, and then wiped over with a cloth dampened with the product, a second solution is used to remove any waxes and silicone that might be contam- inating the leather. Using the sponge provided, I then ‘dabbed’ the color onto the leather, paying close attention to the seams and creases. The product was then left to dry and a repeat application added, the appearance at this point is awful, it looks blotchy and uneven, however the instructions explain that at this stage the intention is to give a back- ground color and to get pigment into the seams. The next step is to add a couple of coats of color with an airbrush, the coloring kit comes with one, along with several compressed air canisters. These work very well but are a little slow to use, I preferred my ‘spotting gun’ attached to a small compressor, ‘The Furniture Clinic’ will actually loan you a com- pressor free of charge!
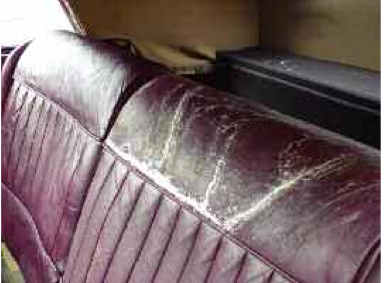
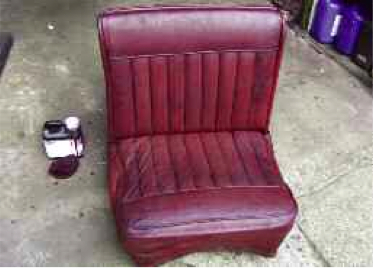
Once the color had been applied and a good even finish achieved, I sprayed on the top coat sealant, this is an important part of the process and provides the final satin surface which is apparently ‘breathable’ but prevents the color from rubbing off. It looked so good that I had to resist the temptation to touch it! The next day I finished with a light applica- tion of my favourite hide food. (see also “Hell For Leather on Page 21) My leather was at the point where it needed replacement, several people had commented that it spoilt an otherwise nice car, it really did look awful. The drivers seat base had many splits and tears, and some areas had worn into holes, the seat back top sections were horrible, the drivers seat had three distinct gaping tears between 3 and 4 inches long, the huge split on the passenger seat had what I can best describe as a large ‘W’ shaped rip (see photograph opposite page top r/h col), was well over a foot long and ran just above the piping. I was advised by ‘The Furniture Clinic’ that their repair method was only suitable for splits of up to about 4 inches, and that this damage would probably require professional atten- tion. However as I progressed with my smaller repairs (and there were lit- erally dozens of them), I became confident that this split could be tack- led. Using a long strip of linen (sourced from the scrap bin at a fabric shop), I cut a suitable patch and glued it to the back of the piping, I left it to set overnight then carefully glued the damaged leather onto it, the large split was then filled with the compound as earlier described and later the entire seat was colored. The repairs have not brought the leather back to a brand new appearance, but it is now very tidy, looking used but presentable, rather like an antique chesterfield sofa should look. I think the photographs on the opposite page speak for themselves and the entire effect is so pleasing, that the critical eye is no longer drawn to the defects.
As a satisfied customer I would recommend this product, I had set a budget of several thousands of pounds to replace this leather, in the event I spent only a very small fraction of this sum, the repair kit in particular I thought excellent value for money. ‘The Furniture Clinic’ have a range of stock colors which are ideal if you plan to re-color the entire inte- rior, but I imagine a color matched to your own leather will give a far better result, especially if you are only making a localised repair. A sam- ple of your leather needs to be sent and the color will be closely matched (I have not tried this service).
I am assured by ‘The Furniture Clinic’ that the repairs will stand up to wear and tear, I have now used the car on dozens of occasions and so far none of the new repairs have failed, this contrasts with previous repair attempts; several splits on the drivers seat, repaired using leather patch- es and super glue, failed almost as soon as the car was put back into use!


What is the difference between the Leather Colorant Kit and the Leather & Vinyl Complete Repair Kit
The Complete Repair Kit provides enough colorant and the right equipment to cover touch ups to small areas and minor repairs.
The Leather Colorant Kit comes in various sizes and the range provides enough colorant and the correct equipment to take on larger restoration projects, from coloring over medium-large scale repairs to complete color changes to car interiors or three piece suites.
I want to change the color of my leather item, should I use the Leather Colorant Kit or the Leather Re-Coloring Balm
The Colorant Kit should be used when changing the color of your leather, the Re-Coloring balm should only be used to restore color to leather and not to change it.
The color of my leather has worn/faded and I want to restore it, do I use the Leather Re-Coloring Balm or the Leather Colorant Kit?
To restore the color to worn/faded absorbent leather items (such as Aniline or Pull-Up) you should use the Leather Re-Coloring Balm as this will soak into the leather and quickly restore the color to its former glory. The balm can also be used to restore color to areas on non-absorbent leathers where areas of minor-cracking have occurred and the natural leather is exposed.
To restore the original color to non-absorbent leathers where more significant areas of fading or wear has occurred you should use the Leather Colorant Kit.
Is the color/finish provided by the Leather Colorant Kit permanent?
If applied correctly, the finish/color provided by the kit can typically be expected to last as long as the original manufacturers finish would taking into account conditions and wear & tear.
I'm unsure what size Leather Colorant Kit I require for my project, is there a general guide or 'rule of thumb'?
As a general rule:
The small kit provides enough product to tackle repairs & restoration to the color of smaller projects such as a footstool, shoes, clothing or a single car seat.
The medium sized kit should be sufficient to re-color larger areas such as an armchair or two car seats.
The large kit will give you what you need to re-color projects in the size range of a 2-3 seater sofa, car seats (two front seats and the back seat)
The extra large kit has been designed for a full car interior (5 seats, door cards, centre console, dash, and all other leather areas) or an entire three piece suite.
Although every project is different, this guide provides a good overview of the scale of projects that each size of the Leather Colorant Kits in our range is suitable for. If in doubt it is always better to go one size larger, providing all of the colorant and finish you need, with some left over for touch-ups should they be needed going forward.
Can the Leather Colorant Kit be used on Vinyl?
The colorant used in the kit can be used on Vinyl, but the colorant layer will not adhere as well to the surface Vinyl as it does on leather. To counteract this, we advise that you apply our Adhesion Promoter before spraying on the colorant, this will ensure a suitable surface for the colorant to adhere to and provide better results and longevity.
I want to change the color of my leather clothing/jacket/sofa/furniture/car interior, is the Leather Colorant Kit suitable for this?
Yes, the Leather Colorant Kit can be used to change the color of any leather surface, no matter what the item may be!
I have a specific colou i require for my project, can you provide this with the Leather Colorant Kit?
Yes, we can provide kits with any color you require. Simply pick a color from one of our color charts or send us a sample and we will match it and send it to you. If you wish to have a color matched, just indicate that you will be sending a sample to us by ticking the corresponding box when you go to add your choice of kit to your basket on the Leather Colorant Kit page.
Can i continue to clean and maintain my leather as normal after using the Leather Colorant Kit?
Yes, but it is important that you do not clean or applying protection cream to the leather item for 7 days after applying the colorant (though it can be used after 24 hours). This gives both the color and the finish time to fully cure before being treated. For total maintenance and cleaning of any leather item we recommend our Leather Care Kit, providing powerful protection and cleaning for any leather item in one handy pack.
Trustpilot Reviews for the Leather Colorant Kit
-
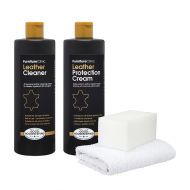
 Leather Care Kit
Great value kit containing a massive 17 fl. oz. (500ml) leather cleaner & leather protector. Clea...
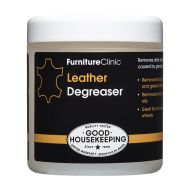
$29.95 - Leather Degreaser
Specialist product used for degreasing leather.
The Leather Degreaser will remove all grea...From $29.95 -
-